")

1. Installation of Sitelinkx Pro
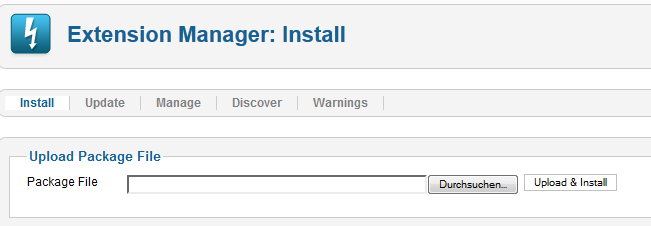
In the Joomla Backend, click on extensions -> extension manager. Select your package file and click 'Upload & Install'. After installation, you can use Sitelinkx Pro.
2. Using Sitelinkx Pro
Click on components -> sitelinkx pro. If you already entered some Sitelinkx, then you'll see a list like in the picture below.

3. Creating Sitelinkx
In the Sitelinkx Manager, click 'New', then you'll see the input mask for Sitelinkx Pro. First, enter the keyword you want to be linked, eg your Sitelinkx, then choose a replacement url.
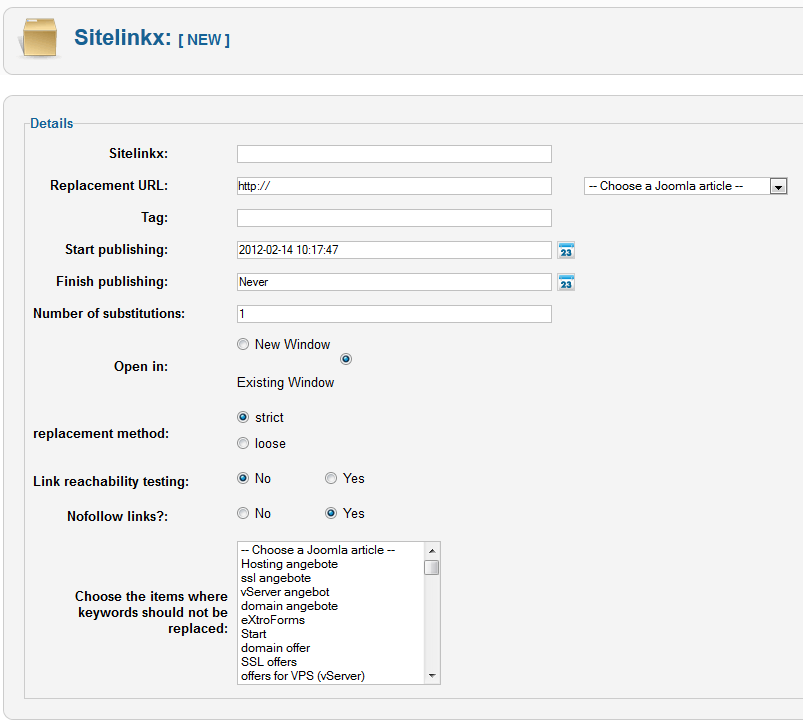
You can either enter the url manually, or select one of your joomla articles.

Next, enter the tag the link should get. The tag is a description/alt text of your link, most browsers show it as a tooltip when you hover over it with the mouse arrow.

The next 2 settings are for start and finish publishing of the keyword.

The numer of substitutions is a per keyword setting , which is new in the pro version. This tells the plugin how often you want to have the keyword replaced in an article, eg if you enter 1 , then the keyword be replaced only once per article.

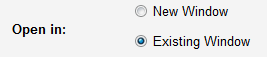
The 'open in' setting defines if the link should be opened in a new window or in the already existing window.
Then choose the replacement method : strict or loose. Strict means that the Sitelinkx you entered is treated as a word, eg if you enter 'Site' as your keyword, then the word Sitelinkx will not be replaced though it contains the letters 'Site'. On the other hand, the setting loose would create a link with the letters 'Site' in 'Sitelinkx'.

Link reachability testing checks if the url you provided is reachable or not. This is disabled by default, since small hosting packages don't have enough ressources to check more than 1 or 2 urls.

Next, define if the link sitelinkx creates from this keyword should be nofollow links. If you set this to 'Yes', the links will be nofollow, otherwise they will be follow.

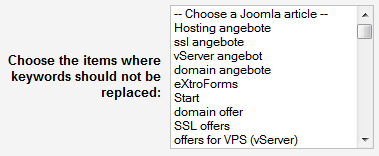
The last setting controls in which Articles/Menu items the keyword should not be replaced by Sitelinkx. Joomla articles are on the top, the menu items on the bottom. This is a multiselect box, so you can choose one, multiple or even all items.
With this last setting, you're done, now click 'save & close'. After saving, you'll be taken back to the Sitelinkx Manager.
4. Checking the output
Now, go to the frontend and convince yourself of the desired result. If you want to change anything, go back to Sitelinkx Manager and click on the keyword you want to change.
5. The Sitelinkx Booster Plugin
Please have a loot at the ZIP file, you will find at the component zip the booster plugin, install it the same way as explained in point 1.
Next, go to Extensions -> Plugins, search for Sitelinkx in the search field. Now you'll see 2 Plugins: the default Sitelinkx Plugin which is activated by deafult, and the Sitelinkx Booster plugin which is deactivated currently. Now deactivate the default plugin and activate the Sitelinkx Booster Plugin. This needs to be done so the 2 plugins don't interfere with each other.
Again, go to the frontend and convince yourself of the desired result.
Please note: Sitelinkx uses the time zone configured in the Joomla! Configuration.
Please make sure that you use your correct local time zone. Joomla uses by default UTC. Leaving this setting may result in unwanted behaviour (except your local time is -IS- UTC).
If Sitelinkx doesn't replace keywords in components like e.g. Virtuemart, check the respective component for a option that allows enabling/disabling content plugins. Virtuemart3 has such a option which is disabled by default. If you enable it, Sitelinkx will replace keywords in VM3 products also.
2026-05-31