")

Prerequisites for the Responsive Gallery:
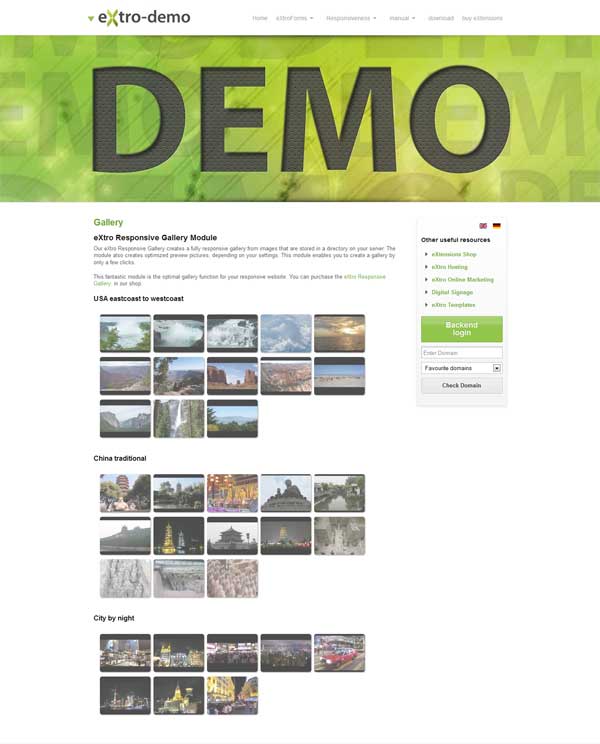
Your pictures for your gallery are stored in a folder within your images folder of your joomla installation. You can use either a ftp client or the standard joomla media upload component.
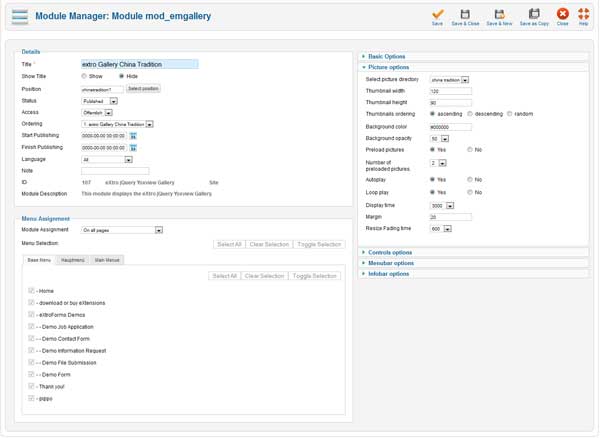
Basic options:
jQuery and the gallery script will be included automatically if needed.
First, select whether the CSS file should be included in the frontend.
Next, choose the language for the gallery, and rtl (right to left support).
Picture options
First, pick the folder where your images for the gallery are being stored.
Then enter the width and height for the thumbnail picture, the original pictures will be converted to this format automatically when the gallery will be displayed for the first time in the frontend.
The thumbnail pictures can be ordered either ascending, descending or random, select your option here.
Next, choose the background color and the transparency, transparency is being displayed in %, eg 50% transparent.
If you want to preload the original pictures for your gallery, select yes and choose the number of pictures to preload.
Select yes on autostart to automatically start the slideshow when clicking a thumbnail. The next option controls looping of the slideshow, ie it will start over when the last picture has been displayed.
Next, set the display time, animation duration for the fade effect and the width of the border for the slideshow.
Options for the controls
Here you can define whether you want to display the prv/next buttons, how long they should be displayed, whether the controls should be displayed and their display duration.
Select the respective options according to your gallery design.
Menu options
Here you can edit your menu options, whether the menu should be displayed and automatically hidden, background color and menu transparency.
Select the respective options according to your gallery design.
Info options
In the last section, you can select if and how the information elements are being displayed.
You can edit background color, transparency and auto hide of the info elements, additionally the position and duration can be set.
New Feature from V1.4.0:
From Version 1.4.0, also video from popular video platforms such as youtube, vimeo or hulu can be displayed.
For this to work, all you have to do is to create a text file with the same name as the thumbnail picture in your gallery folder.
Example:
Your thumbnail image is called video.jpg and is already uploaded. Now you can create a text file named video.txt, its content contains the URL to your video on e.g. youtube. Now browse to the frontend and convnce yourself of the desired result.
Changes in the description file from V1.5.0
From V1.5.0, only one description file is needed.
Create the file description.txt in your images directory and enter the descriptions in this format (one line per image/description):
Example:
In your image folder, you have these image files: img1.jpg , img2.jpg , img3.jpg
The content of the description.txt file would then look like this:
img1.jpg|Description image 1
img2.jpg|Description image 2
img3.jpg|Description image 3
If you want to display a youtube-video, please use this format:
img1.jpg|http://www.youtube.com/watch?v=[videoid]
If you have a lot of image files in your image directory, you should first output the directory listing to a file, this will speed up things.
For Linux: ls > description.txt
For Windows: dir /B > description.txt
Alternatively, you can use a desktop program that allows saving the directory listing as a file.
New description feature from version 1.6.0:
From version 1.6.0 of the eXtro Responsive Gallery, image descriptions can be added in the module's backend.
To use this feature, click the tab 'Advanced Options', here, a new input field called Image descriptions has been added. You can use this field the same way as the description file in V1.5, just enter the imagefile|description in the following format:
filename.jpg|Description of Image file
Only one file|description is allowed per line, separate multiple files|descriptions with the return key.
If you've already created a description file according to the V1.5 manual (description.txt), it will still be used to assure backwards compatibility. Alternatively, you can copy & paste the file's contents into the new image descriptions field in the module's backend and delete the file description.txt afterwards.
Displaying a module in a Joomla article
If you want to display your gallery module wihtin a Joomla article, please read the tutorial we provide
If your images are stacked (under each other instead of side by side):
Sometimes, we get asked why the images in the gallery are stacked instead of side by side.
The reason why this happens is simple: the images inherit some styles from the template which have the property display: block; included. This makes the images be displayed under each other, since only 1 image is allowed per line. So this is a template related issue.
To resolve this, i.e. display the gallery images side by side, you need to apply this CSS override:
.extro-thumbnails a.emgallery img { display: inline; }
Add this line to the module's CSS file (/modules/mod_emgallery/css/emgallery.css), or to a CSS file that gets loaded by the template, e.g. custom.css
2026-05-17